SSO: OpenID Connect
Single-sign-on using OpenID Connect
Introduction
OpenID Connect is an identity layer built on the well-established OAuth 2.0 protocol. OpenID Connect is a modern alternative to SAML, solving many of the protocols known problems. Many of the designers of OpenID Connect originally built the SAML protocol.
This document focuses on how to use OpenID Connect for single-sign-on capabilities with the ReviewPro applications. It assumes that the reader has an understanding of OAuth and specifically OpenID Connect protocols. A simple Google search will provide further information and tutorials on OAuth and OpenID Connect.
Requirements
- Understanding of the OAuth and OpenID Connect protocols
- Be using an identity service that supports OpenID Connect. Some examples are:
- Microsoft Active Directory
- Google Identity Service
- Okta
- Have administrative access to the identity service
- Be able to create an application on developer.reviewpro.com
- Your user's email address on the identity provider must match that user's email address in ReviewPro
- Be comfortable with making REST API calls
Instructions
On your identity provider, you will need to create an application. Please make sure that:
- The openid and email scopes are enabled
- The authorized redirect URIs contains an entry for https://app.reviewpro.com/openid/auth
The application creation will create the following values:
- clientId
- clientSecret
- accessTokenUri
- userAuthUri
- userInfo
- jwksUri
- iss
- redirectUri
The next step, which will be done on your request by the Shiji ReviewPro technical team, will be to create the OpenID Connect settings in ReviewPro using the Backoffice API endpoints related to OpenID Connect. There are three endpoints used for managing your OpenID Settings:
- POST: bo/v1/openid/setting for creates and updates
- GET: bo/v1/openid/settings/{settingId}
- DELETE: bo/v1/openid/settings/{settingId}
POST: bo/v1/openid/setting

This endpoint expects a JSON payload representing the settings as in the following example:
{
  "clientId": "xxxxxxxx.apps.googleusercontent.com",
  "clientSecret": "xxxxxxxxxxxxxxxxxxxxxxhw",
  "accessTokenUri": "https://oauth2.googleapis.com/token",
  "userAuthUri": "https://accounts.google.com/o/oauth2/v2/auth",
  "userInfo": "https://openidconnect.googleapis.com/v1/userinfo",
  "jwksUri": " https://www.googleapis.com/oauth2/v3/certs",
  "iss": "https://accounts.google.com",
  "redirectUri": "https://app.reviewpro.com/openid/auth"
}
The endpoint will respond with the following json:
{
  "id": 1
  "accountId: 1234,
  "clientId": "xxxxxxxx.apps.googleusercontent.com",
  "clientSecret": "...xxhw",
  "accessTokenUri": "https://oauth2.googleapis.com/token",
  "userAuthUri": "https://accounts.google.com/o/oauth2/v2/auth",
  "userInfo": "https://openidconnect.googleapis.com/v1/userinfo",
  "jwksUri": " https://www.googleapis.com/oauth2/v3/certs",
  "iss": "https://accounts.google.com",
  "redirectUri": "https://app.reviewpro.com/openid/auth",
  "scope":null
}
To modify this setting, simply requires posting the JSON payload and including the setting id.
GET bo/v1/openid/settings/{settingId}
Using this endpoint with the your setting id will return a JSON of the the setting.

DELETE bo/v1/openid/settings/{settingId}
Please use this endpoint to remove settings.

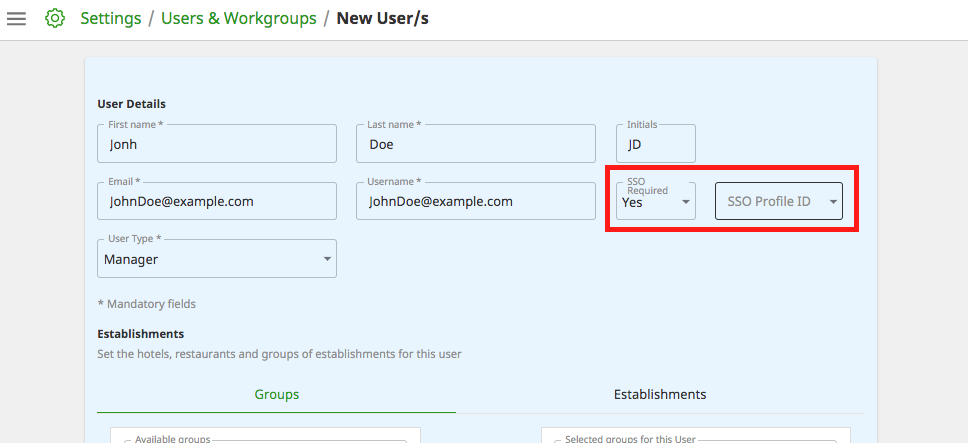
Your OpenID Connect integration is now complete. You are ready to select the user's that you want to use single-sign-on via the settings section of the ReviewPro application. Please mark the option "sso required" and select the "openid" profile for the users you want to activate for SSO login. You can also automate this process by using the Backoffice API to provision users automatically.
Docs Navigation
- Overview
- Authentication
- Lookup Product ID (pid) for Your Account
- Lodging - Review Rating Distribution
- Lodging - Published Reviews Export
- Lodging - Customer Survey Questionnaires
- Semantic Concepts
- Semantic Mentions
- Published Reviews IFrame
- Surveys
- Surveys - Generating personalized links
- SSO: OpenID Connect
- SSO: SAML
- SSO: Deprecated version
- Guest-stays API-endpoints